Electric Lawn Mower Maintenance Guide: 5 Easy Steps to Extend Blade Life and Boost Cutting Efficiency

As a homeowner with a 500 sq. ft. lawn, I’ve been using electric lawn mowers for four years. In the early days, I learned the hard way what not to do. My first cordless electric lawn mower lost efficiency within six months. The grass looked patchy, uneven, and I couldn’t figure out why—until I opened the deck and found the blades dull, caked with dried clippings, and even slightly bent. At the repair shop, the technician told me that with basic maintenance, I could have avoided replacing the blades altogether.
Since then, I’ve taken lawn mower maintenance seriously. My current cordless electric lawn mower is three years old, and the blades still cut almost like new. Below, I’ll share five simple steps that will help you extend the life of your mower blades and keep your lawn looking sharp—whether you use an electric push lawn mower or an electric riding lawn mower.
Why Regular Maintenance Matters for Electric Lawn Mowers
Many people assume that as long as an electric lawn mower starts and runs, it doesn’t need special care. In reality, skipping maintenance leads to two major issues:
Faster blade wear and poor cutting results: Grass clippings, weeds, and small stones gradually dull the blades. Built-up clippings around the deck and blades add resistance, making mowing harder and leaving patches of uncut grass.
Higher risk of breakdowns: Moist grass clippings can cause mold and corrosion inside the deck. For cordless electric lawn mowers, improper battery care often leads to reduced runtime and premature failure.
The good news? With just 10 minutes of weekly care, you can avoid these problems and save money on repairs.
Step 1: Clean Grass Clippings from the Deck and Blades After Every Mow
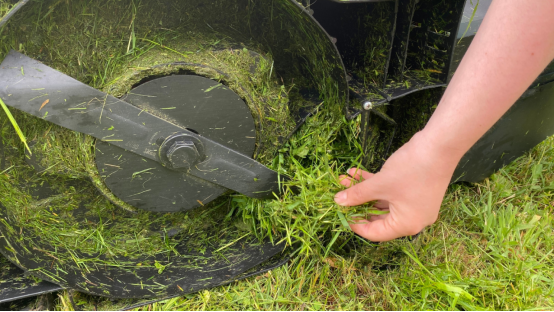
Clipping buildup is the #1 enemy of blade performance. Here’s how to clean properly:
Disconnect power for safety:
For a corded electric lawn mower, unplug it.
For a cordless model, remove the battery (most use a quick-release system).
Use tools, not your hands:
Grab a scraper to clean electric lawn mower deck or a stiff plastic brush.
Insert it through the side opening of the deck and scrape off clippings.
Avoid screwdrivers or metal tools that may damage the coating, and never touch the blade directly.
Inspect the blades:
Look for stuck pebbles or roots and remove them with pliers.
Check for bending or chips in the blade edge.
Personal tip: I once neglected cleaning for three weeks. Moldy clumps glued the blades, and the mower vibrated violently on the next use. It took me 30 minutes to fix—a mistake I never repeated.
Step 2: Check Blade Tightness Weekly
Blades spin at high speeds, and vibration can loosen the mounting bolt over time. Loose blades cut unevenly and may even detach—a major safety hazard.
Use the wrench provided with your mower to test the center bolt.
If it turns easily, tighten it clockwise until the blade is stable.
Don’t overtighten, as it can strip the bolt threads.
Tip: For self-propelled electric lawn mowers, vibration is stronger, so checking weekly is essential.
Step 3: Sharpen Blades Every 2–3 Weeks
Dull blades tear grass instead of slicing it cleanly. This causes yellowed tips and makes the lawn more vulnerable to pests. You don’t need to replace blades often—just sharpen them.
For slightly dull blades (no chips):
Remove the blade with a wrench.
Wipe off dirt and oil.
Use 80-grit sandpaper to grind the cutting edge (5–8 strokes along the original 30–45° angle).
Follow with 200-grit sandpaper for a smoother finish.
Only sharpen the beveled cutting edge, not the flat backside.
For blades with small nicks (under 1 inch):
Wear safety goggles and gloves.
Use a handheld grinder or angle grinder to smooth out the chip.
Finish with sandpaper as above.
If damage is severe (chips over 2 inches or bent blades), replace them. Replacement parts for brands like Ryobi electric lawn mower blades are easy to find at retailers like Home Depot.
Step 4: Lubricate Joints Monthly
Friction in blade joints and mower deck pivots reduces efficiency and speeds up wear. A few drops of oil keep everything running smoothly.
Use light machine oil or sewing machine oil—not grease, which traps clippings.
Apply 2–3 drops to the blade axle, deck hinges, and (for self-propelled models) the wheel bearings.
With regular lubrication, my mower runs quieter and cuts more smoothly.
Step 5: Battery Care for Cordless Models
Battery maintenance makes the biggest difference in extending cordless mower life:
Recharge before fully draining: Plug in when power drops below 20–30%. Avoid deep discharges.
Unplug after charging: Don’t leave the battery connected once it hits 100%—this shortens its lifespan.
Store at half-charge when idle: For winter or rainy months, charge the battery to ~50% and store it in a cool, dry place. Top it up every three months.
For corded electric lawn mowers, check cables regularly for cracks or loose plugs to avoid electrical hazards.
Extra Maintenance Tips by Mower Type
Electric riding lawn mower: Check drive belts and tire pressure monthly. Low tire pressure reduces cutting efficiency.
Self-propelled electric lawn mower: Test brake sensitivity weekly to prevent roll-aways on slopes.
Electric reel lawn mower: Clean between rollers with a small brush to avoid clogging.
Final Thoughts: Maintenance Is a Money-Saving Habit
At first, I thought spending 10 minutes a week on maintenance was a hassle. But after sticking with it, I’ve realized:
I only need to replace blades once a year.
My mower runs more smoothly and rarely needs repairs.
The lawn always looks evenly cut and healthy.
If you own an electric lawn mower, start with these five steps today. And if you run into issues—like difficulty removing blades or charging problems—leave a comment and let’s troubleshoot together. With the right care, your mower will last longer, save you money, and keep your lawn lush and green.