Lawn Striping Guide: How to Create Stripes with a Cordless Electric Lawn Mower

Last summer, I tried for the first time to create stripes on my lawn using a cordless electric lawn mower. The result was crooked lines that looked like “snakes,” and my neighbor walked by jokingly, “Are you painting abstract art?” Frustrated, I researched and consulted professional lawn care experts. I learned that stripes aren’t created by coloring the grass, but by controlling the direction in which grass blades bend—this affects how sunlight reflects off them. With the right technique, even a standard electric mower can produce clean, straight stripes. Now, my lawn consistently attracts neighbors asking for tips. Here is the complete guide, from common mistakes to success, for beginners to achieve professional-looking stripes.
Understanding the Principle: Stripes Are About Reflection, Not Color
Many people think striped lawns are due to grass color differences. In reality, the stripes come from grass blades bending in different directions, causing sunlight to reflect differently, creating alternating light and dark stripes. This is confirmed by the National Association of Landscape Professionals (NALP) and is the core principle of lawn striping.
In simple terms, when a mower blade cuts the grass, it bends the blades in the direction of mowing.
First pass heading east: grass bends east, sunlight reflects less, appearing darker
Second pass heading west: grass bends west, sunlight reflects more, appearing lighter
The height of the grass also matters. NALP recommends keeping grass between 5–8 centimeters (2–3 inches). Too short (under 4 cm), the blades are stiff and won’t bend well. Too long (over 10 cm), the blades are soft and overlap, causing blurry stripes. My first failure was because the grass grew nearly 12 cm, and the blades clumped together, hiding the stripe effect.
Preparation: Choose the Right Electric Mower and Prepare Your Lawn
Creating clean stripes requires preparation. The mower type and lawn pre-treatment directly impact the result.
1. Choosing the Right Electric Lawn Mower
Not all mowers are suitable for striping. Choose based on lawn size:
Small lawns (under 50 square meters): Use a cordless electric lawn mower, 20V–40V models. Lightweight (5–8 kg) and easy to maneuver, perfect for short stripes. My 30-square-meter front lawn is perfectly cut with a 40V cordless model in one charge.
Medium to large lawns (50–200 square meters): Use a self-propelled electric lawn mower. The built-in drive maintains a steady speed (around 3–4 km/h), reducing uneven stripes caused by manual pushing. My neighbor’s 150-square-meter lawn striped with a self-propelled mower had straighter lines in half the time compared to a push mower.
Very large lawns (over 200 square meters): Consider an electric riding mower, but beginners should start with push mowers. Riding mowers require mastering turning radius, which is harder.
Always ensure blades are sharp. Dull blades tear grass instead of cutting cleanly, resulting in ragged edges and inconsistent reflection. I check blades before each mowing and sharpen after every five uses. Sharp blades are key to clear stripes.
2. Lawn Pre-Treatment: Three Key Steps
Water the lawn 1–2 days before mowing: Grass should be moist but not sticky. Too dry, blades break; too wet, grass sticks to the mower.
Remove debris: Pick up stones, branches, or toys to prevent blade obstruction and avoid grass being bent in unwanted directions. I learned this the hard way when a small branch messed up a section of stripes.
Mark your lines: Use stakes and string to create straight guides. Beginners often make crooked lines by “eye-balling.” The string ensures your first pass is straight, and subsequent stripes align properly.
Four Steps to Mow Clean Stripes: Easy Techniques for Beginners
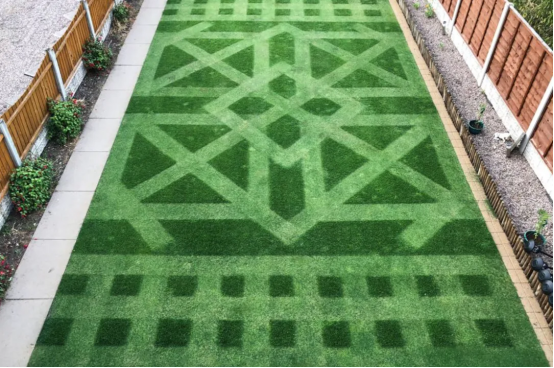
With preparation complete, it’s time to mow. These four steps, refined after multiple trials, ensure stripes remain straight and visible.
Step 1: First Pass “Set the Baseline”
Set the mower height (recommended 5 cm, leaving 2–3 cm for bending). Follow the marked line:
Maintain even speed: Self-propelled mowers at medium speed (~3 km/h); push mowers at about 0.5 m/s. Too fast, blades bend unevenly; too slow, grass may be cut too short in spots.
Keep direction steady: Focus on distant stakes, not the front wheel. My first attempt was crooked because I focused too close.
Avoid rolling over freshly cut grass: Wheels over newly bent blades disrupt reflection.
Step 2: Second Pass “Reverse Direction” with 10 cm Overlap
Turn the mower and mow in the opposite direction (e.g., first pass east, second west). Overlap about 10 cm to avoid gaps between passes. Check mower side markings or align the front wheel with the previous pass’s edge.
For a 45 cm cutting width, overlapping 10 cm produces 35 cm wide stripes, evenly spaced and visually balanced.
Step 3: Subsequent Passes “Align with Previous Edge”
From the third pass onward, use the edge of the previous pass as a guide. Alternate directions and maintain 10 cm overlap:
Third pass east, align with second pass edge
Fourth pass west, align with third pass edge
Continue until the lawn is complete
Check overall alignment every 3 passes. Adjust overlap slightly if stripes begin to drift.
Step 4: Edge Trimming
Use side-cut or hand trimming to clean edges near flowerbeds or paths. Neat edges enhance the stripe appearance. My neighbor often comments, “Your edges look more professional than mine.”
Common Problems and Solutions
Even after following steps, stripes may be unclear. Common issues:
1. Stripes lack contrast
Grass too short (<4 cm): Wait until 5–8 cm before striping.
Grass too tall (>10 cm): Trim to 5–8 cm, then wait 2 days before striping.
Dull blades: Sharpen every 5 uses.
2. Lines crooked
No marked guides: Use stakes and string.
Uneven speed: Self-propelled at medium speed; push mowers use a consistent rhythm.
3. Cordless mower dies mid-pass
Check battery life against lawn size. My 40V mower lasts 45 minutes and cuts 50 square meters per charge. For larger lawns, split into two sessions.
Real-Life Success Story
My neighbor Tom tried my method on his 80-square-meter lawn with a self-propelled mower. Using stakes and string, reversing direction, and overlapping 10 cm, his stripes were straight and crisp. Even his son ran across the lawn saying, “It looks like a soccer field!”
Tom said, “I thought you needed professional equipment for stripes, but ordinary mowers work if you use the right technique.”
Conclusion: Techniques Matter More Than Equipment
Choosing the right mower is important (cordless for small lawns, self-propelled for larger), but the method is even more crucial. Mark your lines, maintain consistent speed, mow in opposite directions, and overlap 10 cm. Follow these tips, and your lawn can achieve soccer-field quality stripes.
If you try striping your lawn, share your results or questions, such as “How to handle cordless battery limits?” or “How to stripe a large lawn efficiently,” so we can discuss solutions and help more people achieve beautiful striped lawns.